How to host a static website using AWS S3 Route 53 & CloudFront
A step by step guide into how to host your static https website with S3, Route 53 and CloudFront.
This article is a step by step guide into how to host your static https website
with S3, Route 53 and CloudFront. Static websites include React, plain old HTML+CSS+JS, Angular - anything
that includes just serving the user with static files.
Before getting started register and buy the domain name you want on Route 53 (Or any other
provider you may like).
The steps we are going to follow to achieve our goal are:
1. Create and configure the S3 bucket
- Route this website through Amazon CloudFront.
2. Create an SSL certificate.
3. Create and configure CloudFront
- Serve the website securely through HTTPS.
- Access site with a custom domain name
4. Configure Route53 to use our custom domain name
I’ll assume you already have an AWS account ready to be used and have a little (tiny little)
understanding
of what the services you’re going to use are.
Create and configure the S3 buckets
Firstly create the bucket to put all the files for your static website in. For the purpose of this post,
I’ll use domain.comas my custom domain. I assume you already have a domain name of your
own that you’ll
use to load your static website.
The bucket you create must have the same name as our custom domain, without the www prefix. Open the S3
console, click create bucket and use your domain name as the bucket name. Next upload all your website
files to it.
Once you’ve done that, go to the Properties tab. There you will find a box that says
“Static website
hosting”. Click that. The box will expand and will allow you to mark the option “Use this bucket to host
a
website” as selected. Then tell S3 which is your index document (usually index.html) and hit Save.
The last thing you need to do is create a bucket policy so that all files are publicly accessible. Head
over to the Permissions tab and click “Bucket Policy”. In the policy editable area paste the following
and
replace domain.com with your bucket name.
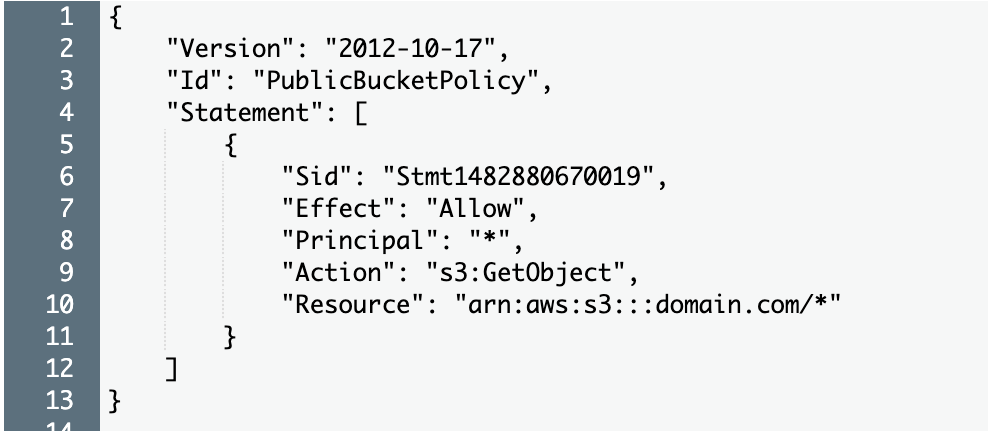
This policy is saying “allow Get access to any of the files in this bucket to anyone”.
Your website is now hosted on Amazon S3.
If you go to the Properties tab of your bucket and click on the Static website hosting
box, you’ll see
that it shows you the endpoint where you can reach the website. The link looks like this:
http://domain.com.s3-website-us-west-2.amazonaws.com. If you click it you should see your website.
Create an SSL certificate
The next step is to create an SSL certificate so that we can secure all the communication to and from
our website. This is useful in case you have a contact form or any other user input in your website.
Using SSL means that all data coming and leaving our website is encrypted. It is what allows you to be
at https as opposed to http.
Amazon has a service for creating certificated and it’s called “Certificate Manager”. Go to the Services
menu and head over to the Certificate Manager.
Make sure you’re on the US East N. Virginia region as this is the only region
supported by CloudFront
for certificates.
Click the “Request a certificate” then “Request a public
certificate”. Add
the domain name you have put
on your bucket etc domain.com. Select DNS validation NOT email. Click “create record in Route 53”. You
will likely need to wait a few minuets for the validation status to change from pending to complete.
While you are waiting you can move on to the next step…..
Create and configure a CloudFront distribution
CloudFront is a CDN. This means a Content delivery network. It allows you to distribute your website
across multiple locations meaning faster loading around the world. This is because when people access
your site instead of all going to the region your S3 bucket is in, say London, they get the site from
the location closes to them, say US East if they are on the east coast of the USA. It also allows you
to re-direct all your traffic from http to https, using your SSL certificate. This means all your
website traffic is encrypted.
So now you know why we are adding CloudFront lets get started….
In your AWS management console go to the Services list and select “CloudFront” and click the “Get
Started” button (the one to create a Web distribution, not the RTMP one).
If I don’t mention a specific field in the process is because you should leave it as it is. If you
want to know what all of the fields are for this video provides a great explanation:
https://www.youtube.com/watch?v=KIltfPRpTi4.
This is what you should fill in:
In Origin domain name choose the S3 bucket you created to host your website files.
This tells
CloudFront from where the content for your site lives.
In Alternate Domain Names (CNAMEs) add your purchased domain name and its www.
counterpart.
In Viewer protocol policy select “Redirect HTTP to HTTPS”. This way we force our
users to go always to the HTTPS version of our website.
SSL Certificate field and choose the “Custom SSL Certificate” option. This will
enable the dropdown below where you can choose the certificate you created on the previous step. If
you don’t see your certificate listed there then it either may not be registered yet (as it takes a
while) or it may not be in the right region: your certificate should have been created in US N.
Virginia.
Next, your Default root object has to match the same index.html.
Click Create Distribution and you are done…
It is likely that you will have to wait a few minuets for the status to change from in progress to
deployed as CloudFront has to propagate the contents of your bucket into all it’s locations, so this
can take some time.
Once your distribution is in Deployed status, you can opening the domain name of your CloudFront
instance and you should see your website. The domain name looks something like
something.cloudfront.net.
Onto the last step… configuring Route53 to tell it to point our custom domain to the CloudFront domain
name meaning people can access our site using https://domain.com.
Configure Route53 to use our custom domain
You need to create some record sets to tell Route53 to point your purchased domain (domain.com)to the
CloudFront distribution domain name(something.cloudfront.net).
Go to the hosted zone of your purchased domain and click “Create record set” on the right panel. Choose
A-IPv4 Address as the type. Then select “Yes” to add an Alias option and set the CloudFront URI as the
Alias Target. This is redirect all request to our domain domain.com to the our CloudFront distribution.
Repeat the previous step but this time creating a AAAA record, giving it the CloudFront url as the alias
target.
Next you need to tell Route53 what to do the exact same when a user types in “www” before your domain.
For this you need to create 2 more records, one A-IPv4 and one AAAA, but this time you’ll fill in the
Name as well with the value www. The value again is the CloudFront url.
You are now done! woooow! The changes are almost instant, so you can quickly check by going to
http://domain.com and http://www.domain.com and you should see your site.
If you followed all the steps, you’ll even notice that when using HTTP the request will be
redirected
automatically to the secure HTTPS version.